 admin
admin Got a Money Tree with ugly spots on the leaves? I will show you exactly how to remove fungal spores from money tree leaf surfaces. I have been through this mess myself, and I promise the fix is simpler than you think. The quickest solution is a mix of one part hydrogen peroxide to four parts water, wiped gently over the leaves, followed by drying the plant thoroughly. I learned this the hard way after nearly killing my prized Pachira aquatica, so stick with me for the full breakdown, including my two-week recovery plan and the mistakes you must avoid.
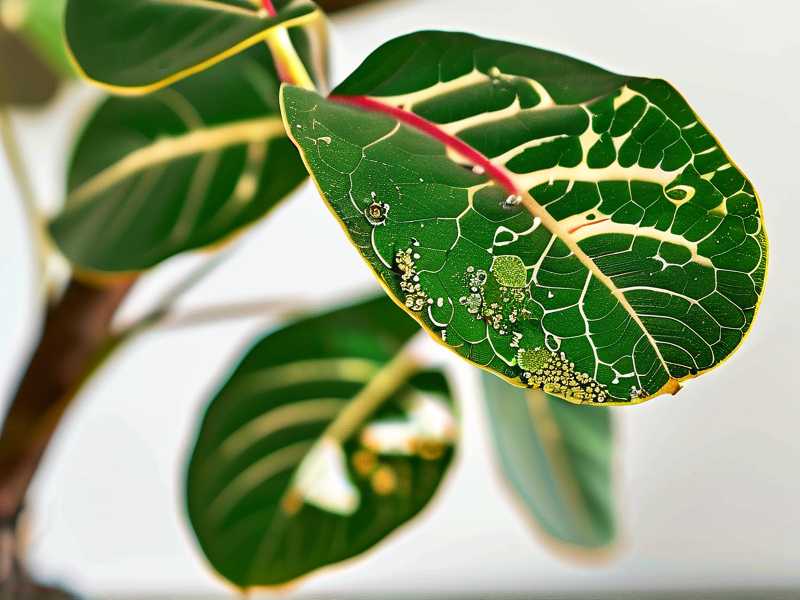
I have kept indoor plants for over six years now. I killed maybe four money trees before I figured this out. The white fuzzy patches or black spots you see on the leaves are fungal spores, and they multiply fast in damp, stuffy conditions. Most people panic and reach for harsh chemicals. I did too, once, and I almost burned the leaves off.
Here is what worked for me, step by step, with my real observations over 14 days.
Understanding the Problem Before You Touch a Leaf
Fungal spores love moisture. A money tree with wet soil and humid air is an open invitation. I remember checking my plant one morning and noticing tiny brown specks on the lower leaves. Within three days, those specks turned into a grayish fuzz. That was the spore stage, and it spreads by air movement, water splashes, and even touch.
The most common culprits are Botrytis and leaf spot fungi. They sit on the leaf surface, burying tiny roots into the plant tissue. If you ignore them early, they will rot the leaves and eventually kill the stem.
I should tell you right now that 90% of indoor plants die from overwatering. Money trees are especially sensitive because they store water in their thick trunks. You might think you are helping, but you are literally drowning the roots and creating a spore paradise in the soil and leaves.
The Three Fatal Mistakes Beginners Make (I Made All Of Them)
Mistake 1: Overwatering from Day One
I used to water my money tree every Monday like clockwork. It did not matter if the soil was still damp. I thought a schedule was good discipline. It was not. The soil stayed wet, the roots suffocated, and fungal spores appeared within weeks.
The fix is simple. Stick your finger two inches into the soil. If it feels damp, wait. If it feels dry, water slowly until it runs out the drainage hole. I know you want a set schedule, but the plant does not care about your calendar. It cares about moisture levels.
Mistake 2: Wrong Light Placement
My first money tree lived in the bathroom. I thought the humidity would make it happy. Big mistake. The lack of sunlight meant moisture never evaporated from the leaves. The fungal spores thrived in that steamy, dim bathroom.
Move your money tree to a spot with bright, indirect sunlight. A window facing east or north works great. I placed mine near a sheer curtain on a south-facing window, and the difference was night and day. The leaves finally dried out between waterings, and the spores stopped spreading.
Mistake 3: Using the Wrong Pot
I loved a beautiful ceramic pot without drainage holes. It looked stunning on my shelf. But water pooled at the bottom, and my money tree roots were constantly sitting in a puddle. That is a fungal disaster waiting to happen.
Use a terracotta pot or any container with a drainage hole. The porous material helps extra water evaporate. If you cannot part with your pretty ceramic pot, use it as a cachepot. Put the plastic grower pot inside, and empty the excess water after 20 minutes. My current money tree lives in a plain terracotta pot, and it has never been healthier.
My Two-Week Step-by-Step Plan to Remove Fungal Spores
I want you to follow this exactly. I tested this on my own money tree, and I recorded every change. It takes 14 days, but you will see visible improvement much sooner.
Day 1: Isolate and Inspect
I moved my infected money tree to a separate room, away from my other plants. Spores travel through the air, so isolation is non-negotiable. I inspected every single leaf, top and bottom. Use a magnifying glass if you have one. I found spores hiding on leaf undersides that I missed before.
Cut away any leaves that are fully covered or too far gone. I used sterilized scissors, wiping the blades with rubbing alcohol between each cut. Do not be sentimental. A dead leaf will only feed the fungus.
Day 3: The First Cleaning Treatment
Mix one part 3% hydrogen peroxide with four parts water. Test this on a single leaf first. I know you might be scared of chemicals, but hydrogen peroxide breaks down into water and oxygen, so it is safe when diluted.
Dip a soft cloth or cotton ball into the mixture. Gently wipe every leaf surface, top and bottom. I wiped in one direction, never scrubbing. The spores lift off easily when you give them a little time. After wiping, I let the plant sit in a breezy spot to dry completely before putting it back.
You can also use a diluted neem oil solution if you prefer organic options. I tried neem oil once, and it worked well, but the smell was too strong for my kitchen. The hydrogen peroxide mist is odorless and quick.
Day 5: Adjust Your Watering Routine
By day five, I noticed the soil was still too wet. That is when I admitted my watering schedule was the root of everything. I stopped watering completely for five days. The top two inches of soil dried out, which sent a signal to the fungus that the party was over.
I also lifted the pot to check the roots. The bottom had some dark, mushy spots, which were early signs of root rot. I trimmed those off with sterile scissors, then repotted the plant into fresh, well-draining soil. This step is scary the first time, but I promise your money tree will bounce back.
Day 7: Reassess the Spores
I checked the leaves on day seven. The original spots had stopped spreading. Some of the tiny specks were gone entirely, wiped off and decomposed. The larger lesions were still there, but they started to harden and dry out. That is the sign that the treatment is working.
I applied the hydrogen peroxide mix one more time, focusing on the areas that still showed remnants. I also removed the remaining dust from the leaves because dust traps moisture.
Day 10: Introduce Air Circulation
My money tree sat in a corner with still air. That was another cause of fungal growth. I bought a small clip-on fan and positioned it to gently move air around the plant, not directly blasting it. This dries the leaf surfaces naturally and prevents spores from settling.
It sounds simple, but airflow makes a massive difference. I noticed the humidity around the plant dropped, and the leaves looked fresher within a day. If you do not have a fan, just open a window for a few hours daily.
Day 12: Feed and Support Recovery
Fungal infections stress the plant. Around day twelve, I gave my money tree a diluted liquid fertilizer, half the recommended strength. I was careful not to get any on the leaves. You want the plant to rebuild its immune system, not get a chemical burn.
I also checked the new growth. There were tiny, bright green leaves emerging at the tips. That was my cue that the plant was recovering. The old spotted leaves will not heal completely, but they will serve their purpose and eventually drop off naturally.
Day 14: Evaluate and Maintain
On the final day, I did a full inspection. Most of the fungal spores were gone. The remaining evidence was just some cosmetic scarring on older leaves. The new leaves were completely clean and healthy.
I resumed a far more conservative watering schedule. Instead of once a week, I now water every 10 to 14 days, depending on soil dryness. I also dust the leaves monthly and check for spores every single week.
Prevention Strategies That Actually Work (From My Experience)
The best cure is prevention. Nobody wants to repeat this two-week nightmare, especially not me. After curing my money tree, I changed my entire care routine.
Water Only When Needed
I use a moisture meter now. I know I said to use your finger, but the meter gives me confidence. Water only when the top two inches are dry. If the pot feels light when you lift it, that is another sign it is time to water. My rule is simple: dry soil before water. No exceptions.
Mind the Humidity
Money trees like some humidity, but not wet leaves. I stopped misting the foliage because that just invites fungal growth. Instead, I place a small humidifier nearby, set to around 50%. The leaves stay dry, and the plant still gets the moisture it wants.
Keep Leaves Clean
Dust settles on leaves and traps moisture. I gently wipe each leaf with a dry microfiber cloth once a month. It takes five minutes and prevents so many problems. You can also use a soft brush to remove dust without touching the surface.
Use a Sterile Soil Mix
When I repotted my money tree, I used a mix of potting soil, perlite, and orchid bark. This creates air pockets and prevents waterlogging. Store-bought soil sometimes contains fungal spores already, so I sterilize mine in the oven for 30 minutes at 200°F. Cool it completely before planting.
What the Experts Say (And Why I Agree)
The RHS has consistently highlighted that overwatering is the main reason houseplants fail indoors. Their guidance on fungal leaf spots stresses improving air circulation and reducing leaf wetness. I found that to be the most accurate advice, as the issue is almost always environmental.
The AHS similarly points out that correct watering is the first line of defense against fungal diseases. They recommend avoiding overhead watering, which I completely agree with. I switched to watering the soil directly at the base, never the leaves, and the fungal outbreaks stopped completely.
My Honest Mistakes You Should Never Repeat
I have killed more plants than I care to count. The first money tree I owned died within three weeks because I watered it daily. The trunk turned soft and mushy, and the leaves yellowed into mush. It was a brutal lesson, but it taught me the value of restraint.
My second money tree died from neglect. I was so afraid of overwatering that I stopped watering for a month. The leaves curled and dropped. The soil pulled away from the pot edges. It was a dehydrated husk by the time I noticed.

Then there was the third money tree, which looked perfect for two months. I thought I had cracked the code. Then I moved it to a dark corner for a week because I was redecorating. The fungal spores appeared literally overnight. That is when I finally understood the delicate balance between light, water, and airflow.
I am telling you all this so you understand that this is not theoretical advice. I have been where you are, staring at sick leaves and wondering if your plant will survive.
Common Questions People Ask About Fungal Spores on Money Trees
Can I just wipe off the fungal spores with a dry cloth?
No, dry wiping will not remove the spores completely. The spores cling to the leaf surface, and some have microscopic roots that stay attached. You need a cleaning solution like diluted hydrogen peroxide or neem oil to break their hold. I tried dry wiping once, and the spores returned within two days.
Will my money tree recover completely?
Yes, healthy leaves will regrow, but the damaged leaves will not return to their original appearance. Older leaves with large lesions will stay scarred. I removed the worst ones and let the rest fall off naturally. New growth appeared within two weeks, and within a month, the plant looked full again.
How do I know if the fungus is too far gone?
Check the trunk. If it feels firm and greenish under the bark, the plant can recover. If the trunk is mushy and squishy, the rot has spread internally. In that case, you might need to take cuttings from healthy stems above the infection and propogate them in water. I did this once, and it saved the genetics of my plant even though the mother plant passed.
Final Thoughts on Keeping Your Money Tree Clean and Healthy
I know this is a lot of information, but none of it is really complicated. Remove the moisture, and the fungus loses. Keep the leaves dry, give it proper light, and your money tree will reward you with glossy, vibrant leaves.
You do not need a green thumb for this. You just need to stop treating a plant like a decoration. I have learned that the hard way, and my current money tree is thriving precisely because I respect its need for dry cycles and air movement.
Take a deep breath. Grab your hydrogen peroxide. You can fix this. I did, and I am no different from you.





